MacBook 6,1 and 640 GB Hard Drive

After my recent memory upgrade to 8 GB, I received my hard drive upgrade. Going from 250 GB to 640 GB was intended to provide sufficient space for several virtual machines for development and other purposes. I first connected the 640 GB drive via USB and used Carbon Copy Cloner to image the system drive. I then physically swapped the drives inside the MacBook. However, one step that I neglected to consider was setting the 640 GB drive to be the boot drive. I had to boot the MacBook from the original drive via USB (thankfully, the MacBooks are capable of doing that) and use System Preferences to change the boot drive.

I now have a white, polycarbonate body MacBook (6,1 or late-2009 model, whichever you prefer) up and running with 8 GB RAM and 640 GB hard drive. Works great!

MacBook 6,1 (Late 2009) and 8 GB RAM

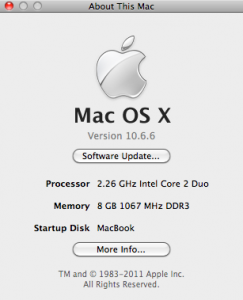
In looking to upgrade my MacBook to a more robust machine (capable of running several VMs without coming to a standstill), I wanted to get the maximum memory possible. Although Apple supports a maximum configuration of 4 GB, I found several references for the 2009+ MacBooks indicating that there was really no reason why the system couldn’t work with 8 GB total. Several users indicated that their machines were running fine this way and I decided that it was worth a 20% restocking fee to give it a shot.

I ordered item #CT2KIT51264BC1067 from crucial.com, which is a kit containing a pair of 4 GB, DDR3, PC-8500 memory sticks. These installed perfectly in the machine and resulted in OSX happily reporting 8 GB system memory available. I also have enough memory to comfortably support a Windows 7 or Ubuntu VM running with OS X rather than requiring me to halt all work except on the specific program I need on the VM.

A caveat: be very careful with the screws on the bottom cover. They are easy to lose (I’m short 1 now as I’ve had the cover off about 3 times). Also, although they appear to be standard Philips (+) screws, they are actually machined screws and you must be very careful with standard screwdrivers as they do not properly contact the screw slots. The correct screwdriver is available but costly, so I used a regular jeweler’s Philips screwdriver and a lot of care.

Next time: upgrading from the 250 GB drive to 640 GB (to make room for full-blown Windows 7 and Linux developmentĀ  environments).

Augen Gentouch78, Part 2

I discovered that the Gentouch78 has more than one version out. If you happen to purchase one of them with the 3.5mm headphone jack and the screen rotation feature working “out-of-the-box,” do NOT apply patches 1 to 3, no matter how tempting. Unfortunately, the backup of the firmware that I thought I’d made didn’t re-install properly. After installing patch 3, I found that the firmware my unit shipped with was actually newer. I haven’t been able to find the firmware anywhere, so now my Gentouch78 is actually less functional than it was when I received it.

Augen Gentouch78 and Linux / Windows 7 64-bit

My wife purchased an Augen Gentouch 78 pad for me for Christmas and gave it to me early because we both wanted to see what it could do. Turns out that it’s a nice little device for the money, although it’s not an iPad as many people point out. However, it also doesn’t cost $600 to $900, and it’s very functional, even if it is a little rough around the edges.

One of the first things I wanted to do was apply the most recent patches. I tried this through Ubuntu 10.10, both using Wine and using a Windows XP VirtualBox, but failed. Wine really isn’t setup for this type of operation and didn’t recognize the device as connected. The Windows XP VirtualBox gave the illusion of working and was able to access the device’s drives, but couldn’t perform the patch using update.bat, nor directly using fastboot.exe.

After some research on the ‘Net, I booted into Windows 7 64-bit instead. It seems that people have had a lot of problems with Windows 7 not installing patches to the ’78 properly. I went ahead and downloaded the PDANet drivers from www.janicefabrics.com rather than trying the various versions of Augen and non-Augen drivers, as PDANet seems the most consistent based on various sources. I installed the PDANet Windows 7 64-bit drivers (using “Run as Administrator”) and made sure they connected to the device while normally operating. No patches have been applied to the device to this point.

The procedure I used was to grab the most recent version of patches (v3 at this time) and unzip them as required into C:os. I started a command prompt (normal mode, not administrator), changed to C:os, and ran update.bat. The program sat at the waiting for device prompt at that point. I then held the “back” button and pressed the reset with a paper clip and continued holding the back button. Once the backlight comes on, the device connected to Windows and the recovery and boot programs transfer, followed by the system program. Note that these should occur within 60 seconds or less. Several procedures recommended not releasing the back button until the system file started, so I held the button to that point. I then released it and left the PC. I’m not sure how long the transfer took as I was gone about 10 minutes and the file had completed by that time.

At this point, I disconnected the USB cable and pressed the reset with a paper clip. It took about 3 minutes for the unit to completely boot, but it was definitely the newest version. One of the little rough issues with these units is that the system reports Telechip 8900 development board in a number of places as the Android version used still has a great deal of default data in it. Doesn’t really matter to me, but someone looking for a polished unit will probably want to get the new Samsungs that are going to hit the market soon.

My impression is that the unit is great other than the power button, which is poorly located and difficult to operate, and the resistive touchscreen, which isn’t as responsive as the capacitive screens. The power switch is pretty much a “live with it” item, while the touchscreen calibration program can relieve some of the discontent, at least.

I still need to apply other patches and will possibly install one of the 3rd party patches ultimately, as there are some great hackers and devs out there. At this point, the unit works pretty nicely.
Xubuntu 10.10 and Windows Shares

Ubuntu offers a more direct method of connecting to Windows shares than that provided through Xubuntu. The Places -> Connect to Server menu item that everyone is familiar with in Ubuntu isn’t there in Xubuntu, but you can start Applications -> System -> Gigolo and get mostly the same functionality. Simply click the double computer icon (the left-most) and enter the correct information.

Now, you’re probably wondering where the hell the files are mounted… the same problem actually exists in Xubuntu as Ubuntu, if you are using the vanilla system. You can easily find the mounted files by navigating Places -> {Your home}. Right click in the file area and click View Hidden Files. Now, find a folder called .gvfs (gnome virtual file system, I believe). You should see any mounted shares in that location. Click and enjoy the goodness of uploading files via Firefox, etc. The love is there, you just have to look for it.

MacBook 6,1; Windows XP; and Windows Update

I finished installing Windows XP Pro (32-bit) along with Apple’s 3.0 Boot Camp drivers (included on the main DVD). Everything seemed to be working fine but my XP version was dated, so I ran Windows Update. I mistakenly allowed it to update the NVidia 9400M driver, which completely toasted my video. I had 640×480 resolution at 2-bit color, so had to go into the device manager and completely uninstall the NVidia display device. I’m now running with VESA only, which is pretty slow compared to the built-in graphics. Here’s hoping that running the Boot Camp update 3.1 fixes the issue.

Stop 7B after Moving a Machine with VMWare Converter Tool

I recently had to move a virtual machine from Microsoft Virtual Server 2005 to VMWare ESXi 4.0. The easiest way to perform this seemed to be the VMWare Converter Tool, which worked with no problems. The machine was a Windows Web Server 2008 SP1 (not R2). When the machine was fired up, however, I got a STOP 7B code. Well, the complete code was actually STOP 0x0000007B (0x80599BB0, 0xC0000034, 0x00000000, 0x00000000). Looking through various sites, I didn’t see anything specific for this migration, but several references to hard drives not found. Checking the settings, the original system was configured as a generic SCSI device, while VMWare had automatically imported as an SAS device.

To fix the problem, I first made sure the machine was powered off and then right-clicked it in the inventory list. Select Edit Settings and then click on the SCSI controller that is listed. If it’s listed as a LSI Logic Parallel SAS controller, click Change Type and select LSI Logic Parallel instead. Reboot and the machine goes through and sets up the correct drivers with no further problems.

Don’t forget to install VMWare Guest Additions. Even if you remote into your system from another machine most of the time, there are still some good drivers.

Systemax 4110 with Ubuntu 10.04, Part 2

Yesterday, I attempted to install Ubuntu 10.04 through the Alternative distribution in the hopes that it would give me more flexibility in selecting or manually editing the graphics driver for X to be used. Unfortunately, the results are less than stellar. In short, it appears that the drivers that come with Ubuntu are not going to function properly and I haven’t even been able to get a stable system boot to manually edit any files. I’ve essentially had to give up on Ubuntu 10.04 on the Systemax 4110 for now as I have too many other pressing concerns. I’ll be trying with Slackware to see how it performs and will try Ubuntu when 10.10 is released in the October-ish time-frame.

Systemax 4110 and AROS (Icaros 1.2.3)

I now have Icaros 1.2.3 setup to dual-boot with Windows XP on a Systemax 4110 (same thing as a Uniwill 223II0). I’m currently using the default VESA graphics and the wireless card (Intel 2200) doesn’t work as there are no wireless drivers available for AROS at this point, but so far the machine seems to be more stable than my desktop machine.

Out-of-the-box, the Intel drivers on the live cd and on the installed version will not work. The 4110 has one of the older Intel chipsets and simply doesn’t work properly. However, the VESA drivers seem to work fine. Sound is improperly detected and will show up under Prefs -> AHI as Unit 0 blah blah blah. Sound doesn’t work on the default. However, if you scroll to the top of the list, you’ll hit the AC’97 sound setting, though, and this one works.

A USB connected (generic) mouse and the touchpad both seemed to work fine, as did the keyboard. Unfortunately, my built-in network card has been busted for several years so I couldn’t test it. However, it’s a Realtek 8139-based unit, so I see no reason why it wouldn’t work.

For those who might not be in the know, Icaros is a ready desktop distribution of the AROS project, which stands for Amiga Research Operating System. One primary goal is to duplicate the API of the Amiga OS 3.1 to the extent that software will cross-compile on either platform with no changes to the source code. There are many other goals and targets involved as well, though, and a full-blown UAE-based (Amiga 68k) emulator is included. Icaros is the preferred distribution as the AROS distributions from the web site are designed primarily for system developers and not for end-users.

AROS brings the look and feel of the Amiga workbench to a standard (x86) PC and is already nicely featured. Missing items include printing (unless you have the proper hardware, i.e., old printer with correct cabling), WiFi networking, and full-featured browsers. However, I’ve found that I can mostly live without oodles of Flash ads and popups, so the OWB browser has been working well. One other missing feature from OWB is the ability to properly login to a WordPress blog. I have to edit this on another machine.

You can find the main AROS site at http://aros.sourceforge.net. This is the AROS system development site and is not really intended for end-users. The community site (lots of support, suggestions, bounties for features, etc) can be reached at http://www.aros-exec.org. Another site of interest is http://archives.aros-exec.org where a lot of 3rd-party software is already available. Finally, browse around the search engines and you’ll find many more sites catering to various aspects of AROS and Amigas in general.

Systemax 4110 with Ubuntu 10.04

I’ve been trying to get my trusty old Systemax 4110 (1.7 GHz CPU, 1 GB RAM, 80 GB drive) up and running with Ubuntu. Unfortunately, I have been unable to get 10.04 running so far from CD or USB due to an issue that’s occurring when the boot process switches from the normal splash screen and starts X. It looks like the Intel video driver is not compatible at some point, although Debian 5.05 loads without a hitch. Currently not sure what to make of this but I’m continuing to troubleshoot. I’ll post more when I figure out how to modify the driver being loaded during installation.

I like the 4110 (re-branded Uniwill 223II0) due to its small size and decent power. I’ve run Puppy, Vector, and several other flavors of Linux on the machine since I purchased it (2004) and have had great success with everything. This is actually the first Linux problem that I’ve encountered but rumor has it that there have been issues on certain old Intel GMA-type chipsets that are causing issues. This unit has the 855GM video in it and is probably having compatibility issues.

So far the only other real problem that I’m aware of with these PCs is the lack of SDHC support on the media card slot. I rarely have need of that function anyway, so it isn’t a showstopper for me.