MacBook 6,1 and 640 GB Hard Drive

After my recent memory upgrade to 8 GB, I received my hard drive upgrade. Going from 250 GB to 640 GB was intended to provide sufficient space for several virtual machines for development and other purposes. I first connected the 640 GB drive via USB and used Carbon Copy Cloner to image the system drive. I then physically swapped the drives inside the MacBook. However, one step that I neglected to consider was setting the 640 GB drive to be the boot drive. I had to boot the MacBook from the original drive via USB (thankfully, the MacBooks are capable of doing that) and use System Preferences to change the boot drive.

I now have a white, polycarbonate body MacBook (6,1 or late-2009 model, whichever you prefer) up and running with 8 GB RAM and 640 GB hard drive. Works great!

MacBook 6,1 (Late 2009) and 8 GB RAM

In looking to upgrade my MacBook to a more robust machine (capable of running several VMs without coming to a standstill), I wanted to get the maximum memory possible. Although Apple supports a maximum configuration of 4 GB, I found several references for the 2009+ MacBooks indicating that there was really no reason why the system couldn’t work with 8 GB total. Several users indicated that their machines were running fine this way and I decided that it was worth a 20% restocking fee to give it a shot.

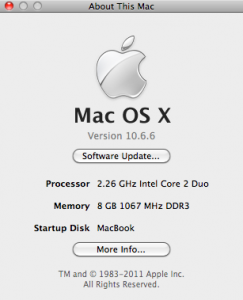
I ordered item #CT2KIT51264BC1067 from crucial.com, which is a kit containing a pair of 4 GB, DDR3, PC-8500 memory sticks. These installed perfectly in the machine and resulted in OSX happily reporting 8 GB system memory available. I also have enough memory to comfortably support a Windows 7 or Ubuntu VM running with OS X rather than requiring me to halt all work except on the specific program I need on the VM.

A caveat: be very careful with the screws on the bottom cover. They are easy to lose (I’m short 1 now as I’ve had the cover off about 3 times). Also, although they appear to be standard Philips (+) screws, they are actually machined screws and you must be very careful with standard screwdrivers as they do not properly contact the screw slots. The correct screwdriver is available but costly, so I used a regular jeweler’s Philips screwdriver and a lot of care.

Next time: upgrading from the 250 GB drive to 640 GB (to make room for full-blown Windows 7 and Linux developmentĀ  environments).

Augen Gentouch78, Part 2

I discovered that the Gentouch78 has more than one version out. If you happen to purchase one of them with the 3.5mm headphone jack and the screen rotation feature working “out-of-the-box,” do NOT apply patches 1 to 3, no matter how tempting. Unfortunately, the backup of the firmware that I thought I’d made didn’t re-install properly. After installing patch 3, I found that the firmware my unit shipped with was actually newer. I haven’t been able to find the firmware anywhere, so now my Gentouch78 is actually less functional than it was when I received it.

Augen Gentouch78 and Linux / Windows 7 64-bit

My wife purchased an Augen Gentouch 78 pad for me for Christmas and gave it to me early because we both wanted to see what it could do. Turns out that it’s a nice little device for the money, although it’s not an iPad as many people point out. However, it also doesn’t cost $600 to $900, and it’s very functional, even if it is a little rough around the edges.

One of the first things I wanted to do was apply the most recent patches. I tried this through Ubuntu 10.10, both using Wine and using a Windows XP VirtualBox, but failed. Wine really isn’t setup for this type of operation and didn’t recognize the device as connected. The Windows XP VirtualBox gave the illusion of working and was able to access the device’s drives, but couldn’t perform the patch using update.bat, nor directly using fastboot.exe.

After some research on the ‘Net, I booted into Windows 7 64-bit instead. It seems that people have had a lot of problems with Windows 7 not installing patches to the ’78 properly. I went ahead and downloaded the PDANet drivers from www.janicefabrics.com rather than trying the various versions of Augen and non-Augen drivers, as PDANet seems the most consistent based on various sources. I installed the PDANet Windows 7 64-bit drivers (using “Run as Administrator”) and made sure they connected to the device while normally operating. No patches have been applied to the device to this point.

The procedure I used was to grab the most recent version of patches (v3 at this time) and unzip them as required into C:os. I started a command prompt (normal mode, not administrator), changed to C:os, and ran update.bat. The program sat at the waiting for device prompt at that point. I then held the “back” button and pressed the reset with a paper clip and continued holding the back button. Once the backlight comes on, the device connected to Windows and the recovery and boot programs transfer, followed by the system program. Note that these should occur within 60 seconds or less. Several procedures recommended not releasing the back button until the system file started, so I held the button to that point. I then released it and left the PC. I’m not sure how long the transfer took as I was gone about 10 minutes and the file had completed by that time.

At this point, I disconnected the USB cable and pressed the reset with a paper clip. It took about 3 minutes for the unit to completely boot, but it was definitely the newest version. One of the little rough issues with these units is that the system reports Telechip 8900 development board in a number of places as the Android version used still has a great deal of default data in it. Doesn’t really matter to me, but someone looking for a polished unit will probably want to get the new Samsungs that are going to hit the market soon.

My impression is that the unit is great other than the power button, which is poorly located and difficult to operate, and the resistive touchscreen, which isn’t as responsive as the capacitive screens. The power switch is pretty much a “live with it” item, while the touchscreen calibration program can relieve some of the discontent, at least.

I still need to apply other patches and will possibly install one of the 3rd party patches ultimately, as there are some great hackers and devs out there. At this point, the unit works pretty nicely.
Dangerous Chinchilla Toys

Having spent the last 15 minutes freeing the head of one of our chinchillas from a toy, I figured I’d make a post here, just in case anyone ever visits. The toy in question is a wire-frame ball that hangs from the ceiling of the cage and can be filled with hay. The chinchillas love the idea and play with them constantly. However, Vin managed to somehow get the wide area of the ball stuck on his head. It might have been funny if he hadn’t been choking and nearly hanging himself. As it was, the thing was too tight (and the wire too thick) to get wire cutters in to snip the wires away, so I ended up gently talking to him and slipping it around his head. Unfortunately, he had both forelegs in there as well, so it took a bit to work him out.

Unfortunately, we can’t remember exactly which pet stores they came from, but we’ll be sure to mention the incident in every store we’re in. The toy concept is a great idea but they should probably be pulled from the market unless they can be made safer. If our son hadn’t noticed, I’m pretty sure Vin would have been dead by morning.

Jiffy Cornbread Mix and No Egg

In the event you’re ever trapped with a need for pancake style cornbread but you don’t have any eggs for the Jiffy mix, you can sub mayo or Miracle Whip. The general ratio that I’ve seen is 1/4 cup of mayo/whip for each egg. However, I recommend starting with a bit less, especially of Miracle Whip. You’ll probably need to add more milk to compensate, but the cornbread will rise nicely. Watch out, it’ll also burn much more quickly. You might want to cut the heat a little from your normal settings.

Xubuntu 10.10 and Windows Shares

Ubuntu offers a more direct method of connecting to Windows shares than that provided through Xubuntu. The Places -> Connect to Server menu item that everyone is familiar with in Ubuntu isn’t there in Xubuntu, but you can start Applications -> System -> Gigolo and get mostly the same functionality. Simply click the double computer icon (the left-most) and enter the correct information.

Now, you’re probably wondering where the hell the files are mounted… the same problem actually exists in Xubuntu as Ubuntu, if you are using the vanilla system. You can easily find the mounted files by navigating Places -> {Your home}. Right click in the file area and click View Hidden Files. Now, find a folder called .gvfs (gnome virtual file system, I believe). You should see any mounted shares in that location. Click and enjoy the goodness of uploading files via Firefox, etc. The love is there, you just have to look for it.

Boyle County Band Competition

The Boyle County Band held their home competition today and did a fantastic job. We only attended for the last portion of it due to schoolwork and other commitments, but everything looked great. More importantly, Boyle County sounded great and performed very well. As the host band, it’s always good to outshine the competitors šŸ™‚ The trumpets did an outstanding job!

Genealogy Update (Again)

Well, after tinkering with TribalPages.com for a bit, I’ve reached the conclusion that they provide a much nicer family tree (sans adoption records, I guess) than phpGedView, when considering the total maintenance. The online editing feature works very well and for $2 a month, it’s hard to beat. If you visit http://genealogy.marstella.net, you’ll automatically be redirected to http://marstellafamily.tribalpages.com. That was the easiest way to do things at this point. There’s an option to request access, as I really don’t want the scavengers taking data from the system that might be invalid. I will probably open it up a bit after I upload some of the current data that I have written scribbled in various places, but it will probably be around Christmas.

Fairly Simple Skillet Cornbread

We had plenty of soup beans tonight but I forgot to buy the cornbread mix that I normally get, so I went looking for a recipe I could whip up from things already at the house. Unfortunately, nearly everybody puts baking powder (which I didn’t have) in their cornbread, so I made a few changes. The only real problem with the batch I made is that it didn’t taste as sweet as we prefer. Still, turned out pretty good for hybrid recipe taken from 4 others.

  • 1-3/4 c corn meal
  • 3/4 c flour
  • 1 tsp salt (forgot to put it in, but turned out okay anyway)
  • 1 tsp baking soda
  • 1 tsp corn starch
  • 3-4 drops lemon juice
  • 1-1/2 c milk
  • 1 egg
  • 2 tbsp butter
  • a few small pinches of sugar

Let the pan heat up; I used a little more than medium heat. Once it’s hot, I add a little canola oil. I don’t normally put much oil in the bottom of the skillet since it’s non-stick, just enough to get the edges of the “pancakes” to sizzle. Then cook until you can see the cake starting to solidify up the side just a little and carefully flip. Total cook time per “pancake” is about 3 to 4 minutes, maybe less. Once the pan gets good and hot, you’ll have to watch or they may cook too quickly.

The recipe actually turned out a little thick, so cutting in some more milk probably wouldn’t hurt. Also, they rose much more than I expected, considering the way I substituted for the missing baking powder. A little more sugar and these would have been just about right.